Posts

Showing posts from September, 2018
Image
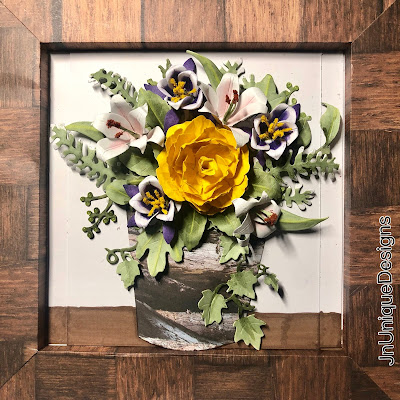
Today I decided to create a new project using one of the new dies recently released by the great Susan Tierney Cockburn. This die can be found on Elizabeth Craft Designs website. First a little bit of history, the Cymbidium Orchid is also known as the boat orchid. it gets its name from the greek word for boat "kymbe" due to the bottom petal curling up like a boat.  I had so much fun trying to make this flower on my own without knowing what I was doing. Things you need: 1) Balsam wood 4'' x 2'' 2) White 85lb cardstock 3) Deco foil - gold 4) Copic Markers - Y18, G94, G99, YG11 5) red pollen purchased on ECD websites found  here 6) a 20 gauge green wire found at Hobby Lobby and finally  6) hot glue gun. before you begin follow this link to Susan's Garden Club  to see how she makes the Cat Tails. the Cat Tails need some time to dry and create. I new used a piece of balsam wood and cut it into a shape of a pot I
Image
Well it been a couple of days since I've posted but what a wonderful day it is. First off I wanted to share with you this last weeks experiences. This week I got to meet the Great Els Van De Burgt. The one the only most genuine person I have ever met when it comes to making art. This was an amazing day to have met someone who inspires so many and love by even more.  I would like to share a few images of what I love to create. Flowers. Here a couple of images from the Scrapbook expo...All flowers seen are created by the great Susan Tierney Cockburn. An finally, here is my haul for this years...Scrapbook expo. Stay tuned for projects using all these items. Truly this is a great weekend...stay tuned
Image
CHRISTMAS IS COMING Hey all today I decided to share with you an older project. This project was created for christmas using several new items to me. I used glitter pens from Spectrum Noir. I got them on Amazon. Well it turned out great fro Christmas flowers. I also added a little bonus today which was trying to create a flower after gold leafing the items. Take a look and let me know what you think.  The Purple poinsettia were inspired to me at my local church I attend. They ordered this for Advent time and it was painted Poinsettias so I loved trying to imitate something that was in existence in real life. Enjoy J. Nguyen  Pretty Standard design above using the pitcher from ECD and woodland leaves. 7 This is a recreation of my parish church's design for Advent 2017 Gold Leafing of the flowers prior to shaping. Another recreation of my Church's Flowers
Image
Over the last several weeks, ECD (Elizabeth Craft Designs) through Susan Tierney Cockburn has created a challenge called the #MyPaperMasterpice. it is set up to recreated the masterpieces of our world. everything from Monet to O'Keefe. Many were made, and you can check them out on ECD family page. Here are two of my contributions. Now we know who the winner is...and we’ll deserved..check her work it’s amazing on the ECD family Facebook page. Heather great work!!!

Fall for your for your Birthday

Image
Good Morning all, Today decided to try some new products, the French Pumpkin from Elizabeth Craft Designs created by Susan Tierney Cockburn. Beside that new flower I also used the Lily 2, Dahlia, Shasta Daisy and the woodland Leaves.  I also tried a new product I got my hands on it is call gliding polish by cosmic shimmer. I used a color called copper red. It really turned out well on my pumpkin and looks good too. The Polish dries instantly and boy was it a ease to use. I think I may be investing in some new colors. Hope you like my design for this birthday card below. Thanks for your support, J. Nguyen

Moosy Birthday

Image
Hello Everyone, here it is the long awaited post for a Birthday card and class I will be teaching. The materials used: Elizabeth Craft Designs Die # 1564 Moose and Die # 1567 Santa Claus. Linco Neutral Glue sold on Amazon 85lb card stock Distress ink - Vintage Photo Wood Grain paper from Hobby Lobby Double side adhesive tape from Elizabeth Craft Designs This card is an A2 (4.25” x 5.5”) it will fold flat and fit any A2 envelope. Follow me on Facebook at JnUniqueDesigns also for inspirations and new designs. This is what we will be making: First take a full sheet of 8.5”x11” cardstock of your choice. Cut the piece of paper in half to make two sheets (5.5”x8.5”) Using a scoreboard of your choice, score one of the sheets at 4.25” (will be known as sheet A) On one of the sides of the sheet cut off 1/2” (as shown) The second sheet using a score board score lines at .5” & 4.25” & 4.75” (will be known as sheet B) On the sheet B cut off a sliver
Well Good Morning All, I was just inspired to create this blog. Hoping it will work out for the better. A few of my new projects will be posted shortly. Hope you can come here learn and share the fun of paper crafting. Yours truly, J. Nguyen JnUniqueDesigns